
Farm Notes
This week has brought the first stretch of warm, dry, and glorious spring weather – which means we are now in full-on planting mode! Earlier this week, I learned that the thousands of spring seedlings I had ordered would be arriving a whole week early… which may not sound like a big deal, but I was planning on using these next 7 days to get all our growing beds prepped and ready for these new plant babies, so we are suddenly WAY behind schedule when it comes to bed preparation (see below for some progress made yesterday on getting some beds ready).
Alas! Yesterday we received all our beautiful seedlings for the spring season – lettuces, asian greens, swiss chard, kale, fennel, kohlrabi, onions, beets, broccoli, cabbage, etc etc – and now the next few days are going to be non-stop hustling to get these plants in the ground. I’m grateful that the weather forecast for the next few days is staying warm and dry, so it’s a great time to get these new seedlings established… even if they arrived early to the party. ;)

Prepping beds in progress…

… and beds prepped and ready for planting!
But today, I want to focus on a crop that we planted last week… asparagus! I’m excited to share more about the process of planting and growing asparagus, in case you are interested in giving it a try in your growing space. Asparagus is a perennial that takes 2-3 years to get established before you can get a proper harvest, so it’s definitely a commitment and requires some patience, but I think it is well worth the wait!
ASPARAGUS NUTS & BOLTS
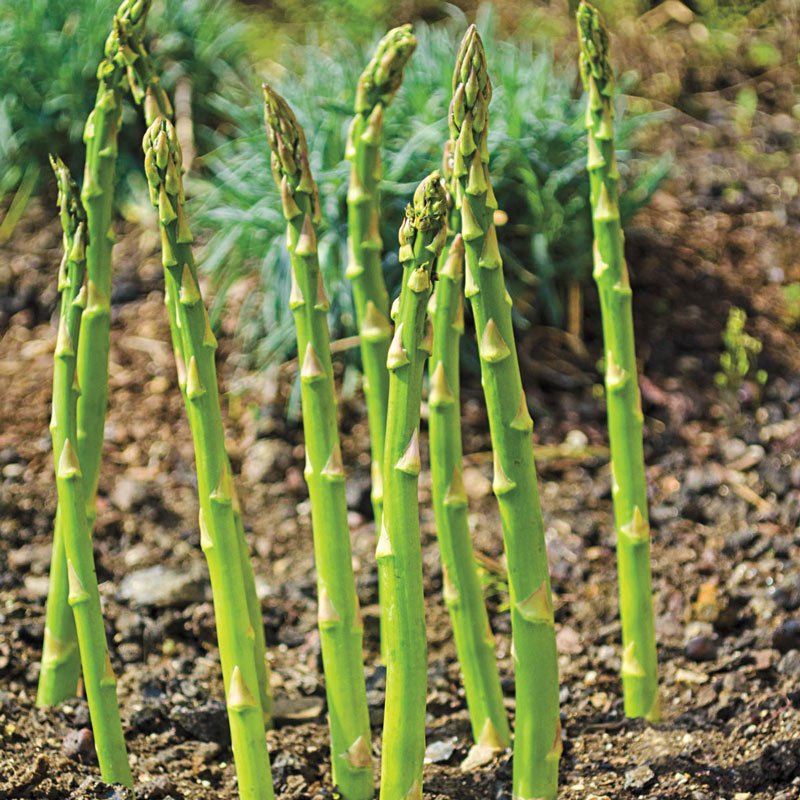
We purchased our asparagus crowns from Nourse Farms, and the variety we chose is called ‘Millennium’ (though other common and respected varieties are Jersey Knight and Jersey Giant).
The best time to plant asparagus is in the winter, between mid-January and mid-March, while the plants are dormant.
When choosing a site for your asparagus, a few things to keep in mind:
Choose a sunny, well-drained site with soil that holds moisture well.
If possible, prepare your site a few months/weeks ahead to clear out any grass or weeds. It also helps to apply some compost to the bed a few weeks before you plant to plant.
Late spring frosts can kill new spears, so pick an area that is not especially low-lying or exposed to frost.
If the asparagus bed is to be part of a larger vegetable garden, the best place is at the north end of the space (so the tall ferns that grow in the summer/fall do not shade your other crops).
HOW TO PLANT ASPARAGUS
Step 1: Dig a trench – Dig a 12” wide by 8” deep trench wherever you plan to plant your asparagus crowns. Ideally the area where you plant the asparagus will already be free of grass/weeds, as asparagus doesn’t like to compete with other plants for nutrients. As the soil is removed from the trench, set it directly to the side. It will be returned to the trench as the spears grow.
Step 2: Apply amendments – Asparagus loves phosphorous, so it’s recommended to add organic bone meal (about 1/2lb per every 10 feet) to the bottom of your trench before planting.

Step 1: Dig trench

Step 2: Apply amendments
Step 3: Set your crowns – Lay crowns in the trench with the long roots running parallel with the trench (see photo below for example). Space plants so that the center “buds” of each crown are about 12” apart.
Step 4: Partially cover the crowns – Next, cover the crowns with 2-3 inches of the soil that was removed from the trench previously. The rest of the remaining soil will be added to the trench a few weeks later, once the spears begin to emerge above ground. As the spears grow, gradually fill in the trench with a bit more soil – within 6 weeks, the furrow should be completely filled (this method helps to limit weed development).
Step 5: Water – Make sure to water in the asparagus crowns well after planting, and as the asparagus grows it should receive around 1” of water per week, either by rain, hand watering, or drip irrigation. Soil moisture is important for good root and fern growth in asparagus, and they need consistent soil moisture in order to stay healthy for the next year.

Step 3: Set your crowns

Step 4: Partially cover crowns
And there you have it! Hopefully this is a helpful visual guide for planting asparagus, and I’ll be sure to keep sharing tips for overall asparagus maintenance and care as the season progresses. The main thing for the first year of growing asparagus is to keep the bed well weeded, watered, and do NOT harvest any spears in this first season so that the plants can focus on developing strong root systems. If you have any questions or need help troubleshooting, don’t hesitate to send me a message. Happy growing everyone!
Today’s Stats
Low temp: 40F
High temp: 57F
Sunrise: 6:41am
Sunset: 6:15pm
Moon phase: Waxing Crescent
Additional notes: Sunshine!